(This post has pictures of an undressed doll for the purpose of showing how I restored her.)
Do any of you guys remember that my second newest doll, Katy Christine, was actually bought secondhand from my BFFs’ neighbors in Texas? I made a post about how I planned to fix her up here.
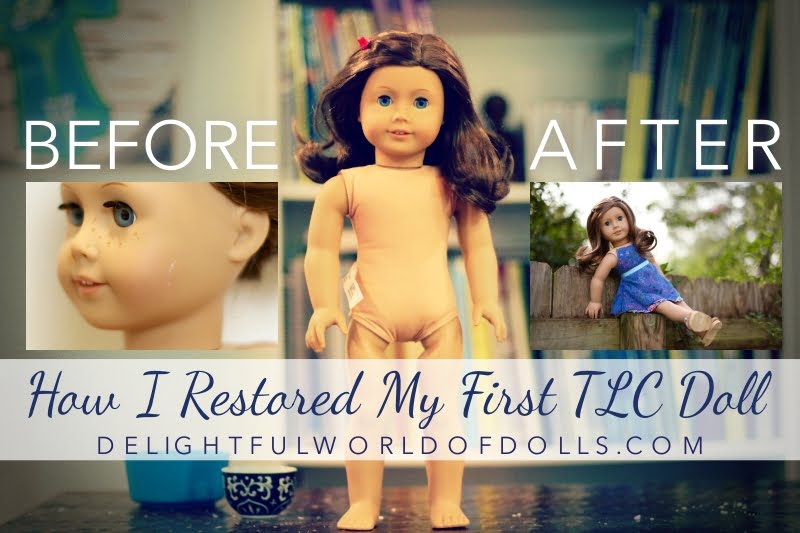
It’s been months and months since I restored K.C., and I’ve just never made a post about it until now! Katy was my first doll bought secondhand in need of Tender Loving Care.
I’m finally getting around to share with you how I removed all of her stains and scuff marks.
By golly, she had a lot of them. I think I bought her from a seven year old who had owned her for two years.
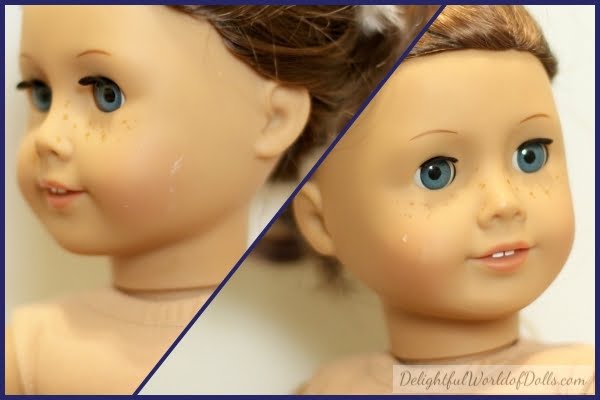
What worried me most were these cheek stains of hers. If I was able to remove them, what about her cheek paint? Would it be removed as well?

I started with what I knew.
The ol’ baking soda and water cleansing solution. In a small bowl, I mixed a few spoonfuls of baking soda and some water together until it had the consistency of toothpaste.

After dipping the towel in the baking soda and water solution, I scrubbed all over K.C.’s vinyl, even a little of her face.
Then, I dampened another edge of the towel with water and wiped it all off, drying her afterward.

Next, my new secret weapon: persa-gel.
Meg from Canadian Doll Notebook was a lifesaver. If you know me, I like asking a lot of questions. And she answered them all. I learned about this awesome stain-removing tutorial from her post about it, and boy has it ever worked!

I actually first needed that tutorial because I took a black DreamWorld Collections hat off of Chloe only to discover a terrible black stain had bled onto her skin from it.
And only weeks before I was supposed to shoot The Goodbye. Talk about pressure!
Freaked out, I began working persa-gel’s magic. It worked quickly, and even though I didn’t have enough time to remove it all the way, you can’t see it anymore. I’ll make another post about that later with a full tutorial of how I did it super quickly.

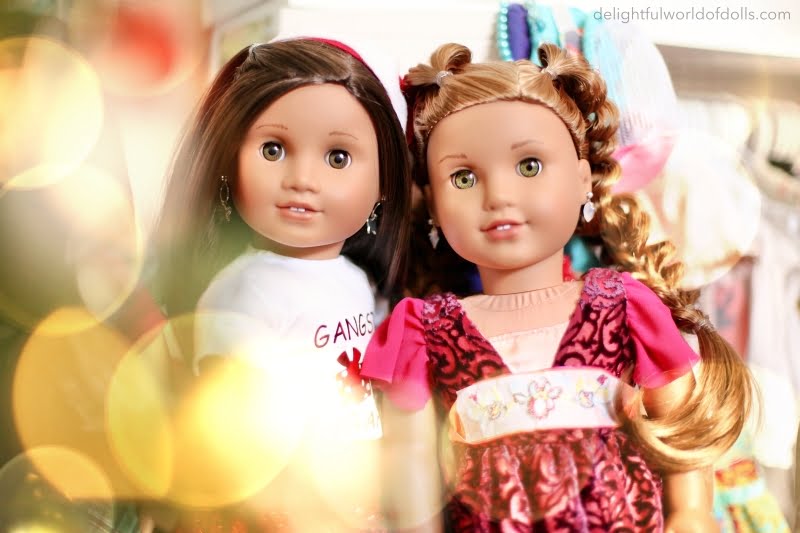
Katy and Chloe had some… interesting bonding time during their stain treatments.
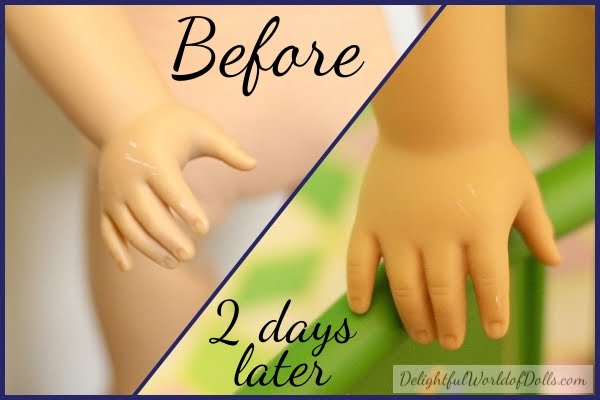
Two days after letting the persa-gel sit on Katy’s hand in my window where she could get sun, look how much the stain has faded!
Later, I realized the white stains on her hand on cheeks were actually scuff marks, and I quickly switched my methods to this one.
Somebody call Mr. Clean.
Working on Katy’s stains and scuffs with a damp Magic Eraser removed them all.
Well, mostly all. What about those cheek marks? I was scared to death of removing her cheek paint.
BUT I WAS BRAVE.
I carefully worked on the stains; thankfully, most of them were around the very edges of her cheek paint. And yes, the cheek paint was removed along with the stains.
One of the scuff marks was directly on her cheek paint, so I barely worked on that one just a little. The more the stain faded, the more her cheek paint did.

I finally stopped before the very faint missing dot of cheek paint could be more noticeable. Katy still has her little scuff mark there, but you can barely see it in any of her pictures! Phew.
Her hair and limbs were already in great condition, so all that needed work was her skin. Even though I was really dumb and said a high price for her right off without even seeing her first, I still got her for a fair deal, and it was really fun to bring her back to her full potential. (Her remaining scuff mark makes her special. ;) )

I’ll make a post about removing Chloe’s stain soon! I’m so happy the persa-gel worked. It’s amazing.
You can view Katy’s full photoshoot here!
Have you ever restored a doll in need of TLC? What do you think of Katy now? Do you think she looks better?


HAHA, Madi, I was starting to read this and I thought, “Madi must have made a mistake because I have seen this post before.” So, I typed in the searchbar TLC and this came up along with your “Whoops” post. I realized that you accidently posted this before and I read it then, then you deleted it and posted your “Whoops” message. I was so confused. XD Great Post! I liked seeing the methods you used!
HAHA, exactly. XDD Sorry ’bout the confusion. XD Thank you SO much, Liz! <3
Wow! Katy looks so much better!!!! I’ve never restored a doll before but if I do I’ll use your methods! What did you do about her hair? Was it already in pretty good condition when you got her?
(replying to a copy of your comment from when this accidentally posted in December)
Thank you SO much!! Her hair was already in pretty good condition when I got her, yeah, but if it wasn’t, I would just wash it with a little shampoo and then conditioner and re-curl it.
Thanks for the tip! I’m thinking about restoring a doll soon!
You’re so welcome! Ooh, if you do, I hope you have fun!
Wow, this is amazing!!! I can’t believe how awesomely you fixed K.C.! I’m thinking of getting a TLC Doll soon, these tips will sure come in handy!!!
Thank you SO much, Hope!! Ooh, I hope these tips help you!
She looks great! I use that stuff on my own face. ? It should read “For all skin types”.
My sister actually has a doll I was suppose to fix up. Maybe after Christmas and before classes start back I will work on it.
Madison
I’m thinking about using it on my face, too! XD
Ooh, that sounds like a fun project! I hope she’ll be easy to fix up if you do fix her.
Like, a bazillion times better, girl.
Since you made this post, you have now officially opened yourself up for questions. ;P
Do you know how to get a scratch off that’s next to the eye? One of my Breyer horses fell off my shelf onto Autumn and gave her this stupid scratch on the side of her nose. It’s black and ugly and drives me insane.
Nice work fixing her up – I have this fantasy that I’m going to start a business buying trashed dolls off of eBay and restoring them for resale. IDK why, it just sounds fun.
HEHE THANK YOU.
HEHE I LIKE QUESTIONS.
If I saw a picture of the scratch, I think I could help you better! I have quite a few different tutorial resources that might be helpful.
Thank you so much! Hey, that does sound fun! xd
She is sooooo cute! I have that same doll!
(replying to a copy of your comment from when this accidentally posted in December)
Thank you so much! Ooh, you do? That’s awesome!
Great post! I am working on fixing a AG Samantha doll that I got when I was 8. Boy she has a ton of marks and everything! XD Any tips for fixing loose limbs? Or putting cheek paint back on?
(replying to a copy of your comment from when this accidentally posted in December)
Thank you so much, Hannah! OOH, that sounds like a fun project! I admittedly haven’t had to fix any doll limbs, but for cheek paint, you can use real blush and then you’ll have to seal it: http://www.nonaptime.com/2015/02/repaint-faq-sealant-alternatives/ There is actually a video on YouTube I had saved about redoing your doll’s cheek paint, but I forgot where I saved it! You might check on YouTube for a doll cheek paint tutorial.
Madi: I was wondering about that too, so thank you so much!
Hannah: There’s a tutorial here on limb-tightening. I’ve used this method before and it works great! http://www.americangirlfan.com/2009/02/the-journey-of-fixing-up-an-american-girl-dollpart-2.html
(I know I’m not Madi but…) you can actually go inside Samantha and tie hair bands at the base of the limbs!! It won’t make them perfect, but it’ll definitely make a difference!! And you can use red water color paint to touch up the lips & cheeks! I used the paint on my 6 year old doll and she looks brand new!!
HEHE ITS HERE AGAIN. YOU MEANT TO POST IT THIS TIME, RIGHT! XDDDDD
HEHE YES AND YES. XD
Wow! She looks amazing! :D
Thank you so much! :D
This was cool! Where did you get this doll from?
-Rose
Thanks, Rose! I bought the doll from my BFFs’ neighbors in Texas, from a seven year old who had her for two years. She’s My American Girl #23.
I’m really interested in getting into TLC dolls, so PLEASE pray that I can earn enough money to buy dolls and supplies. Thanks!
Kristal: Wait, REALLY? I didn’t know that! Do pray that K can make this happen, because I LOVE meeting new dolls!
Lea: Copy that! #NewFriendsFTW!
I’ll definitely pray! Fixing up TLC dolls is super fun!
Thanks! My dolls and I appreciate it!
KC and Chloe are such beautiful dolls! :D I’m so glad you were able to clean up KC, she is so beautiful! Yes, I have restored a doll before, I found Josefina at a thrift shop! But, she didn’t have scuffs, she was just dirty so I used Mr. Clean eraser and got all the dirt off and then conditioned her hair because it was kinda a mess, haha! Now she’s beautiful!
I’m looking forward to Chloe’s fix up post! :D
They both say thank you! :D Ooh, you did? That’s so awesome! Your Josefina does indeed look beautiful now!
Wow! K.C. looks great!!! Awesome job! Avery is a second hand doll too. You can remove the scuff with rubbing alcohol, and you can repaint her cheek too. Just use acrylic paint and a mix medium. Mix the paint to match the cheek color and as you move further from the center start mixing paint and mix medium to match the skin.. If you’d like I can link a video. I hope I don’t sound like a know it all, I just do a lot of this stuff for my doll restoring business and know a lot of adult AG collectors who restore too so I thought it might be helpful :) Oh! And I got your card! Thank you so much! It meant a lot.
– Katie :)
Thank you SOO much, Katie!
And oh my goodness, I had no idea you could do that or that you had a doll restoring business! That’s so awesome!
And YAY, I’m so glad you got the card!
I love reading these sorts of posts!! K.C. Looks amazing. :D
YAY, I was hoping it wouldn’t be boring! XD K.C. says thank you!
Haha, like anything Madi wrote could be boring. :P
Awwww XD
<3 XD
Yay! I was excited to see this up! Maybe I can try some of these techniques to clean Julie up, as she has some stains and things since I’ve had her the longest of my dolls.
~Gracie
I’m so glad you liked it! I think these techniques would be super helpful for your Julie. If you have any questions, I’d be glad to help!
She’s so pretty!! I seriously want a doll like this mostly for her hair. XD
Haha, I hope you get one! XDD
XD lol
That was really cool!
Someday I want to fix up an AG doll.
Thank you so much!
It’s super fun to do!
This is so cool! You did a great job fixing Katy. ?
-Sara
Thank you so much, Sara!! :D
I tried the baking soda trick when I was making Ashton (https://www.youtube.com/watch?v=p9T5vAFdRbM) and it works really well! K.C. looks so much better now, I couldn’t even tell that she was a TLC if I looked at her pictures when she was finished!
It really does! Aww, thank you so much! I’m super happy with how she turned out.
This is awesome!! Katy is so cute!! You an actually use red water color paint to restore the lip and cheek color!! It works wonders. I have had my doll kit for 6 years so you can imagine that her cheeks and lips had faded. I used red water color paint on her and she literally looks BRAND NEW!!!!!! No joke XD
Thank you SO much, Analise! And ooh, really? Does it ever come off if it gets wet, though?
Nope!! It actually withstands nail polish remover, water, baby wipes and more!! Trust me, I’ve tried XD
Woah, really? Wow! XD
Super cool! You did an amazing job! I’ve taken Ebony’s head off to tighten her limbs before and I untied Saige’s strings to re-tighten them again!
Thanks so much, Bella! Oh, wow, really? How did you do that?
Of course! Yep! I was a little worried the first time that I took Ebony’s head off to tighten her limbs that I wouldn’t be able to get her head back on, plus I had to completely un-stuff her! Basically there are these plastic things attached to a thick elastic band inside of each one of the AG doll’s limbs… they get loose after a while and to tighten them, you have to remove the doll’s head, completely un-stuff them, then pull on the plastic thing that’s attached to the elastic band and tie a hair elastic around the elastic band… this probably sounds confusing, so feel free to look it up on YouTube… you can probably just type in “how to tighten your ag doll’s limbs.” :)
Woah, that is so awesome! I’m always too scared to try anything like that. ? Thanks for telling me!
Thanks, Madi! I know, I was super scared at first too, but everything worked out fine! Of course!
Katy looks AMAZING! WAY better! It’s amazing how much you can do to restore a doll.
I’ve restored a lot of dolls (I’ve used all of these), both for myself and for my business.
Thank you SO much! It is, isn’t it?
Woah, that’s so awesome!
She looks so much better now. Great job!
Thank you so much, Allie!
She looks gorgeous! Job well done.
Thank you so much! It was so fun.
Hey, do you know how to get pen off a doll?
Here’s the tutorial I used for getting both stains off of Katy and Chloe. It should work with pen stains as well! https://canadiandollnotebook.com/2016/04/28/removing-stains-from-your-vinyl-doll/
I actually had luck with just 5% benzoyl on a mild pen stain with Kit not long after I first got her as a gift from a friend of mine, but your mileage may vary depending on the brand I guess. And out of boredom I was curious if this would also get rid of dye stains on certain other surfaces, and it seemed to do the trick.
Ooh, that’s good to know. Glad you were able to get that pen stain out of Kit, and I didn’t know it would also remove some other stains! What a handy cream.